How to
install & configure
your forms (pro version)
Last updated: 8th January 2022
The following areas are covered in this guide:
More detailed information on how the code works can be found in the following areas.
- Getting to know the files
- The forms HTML file
- The forms Configuration file
- The forms CSS file
- The forms JavaScript file
- The forms email template files
- The forms language files
Form installation overview
This guide covers how to install and configure your form (version 1.4 and above).
Although our forms are simple to use and setup, they do contain a lot of flexibility and have been designed to work out of the box as much as possible with minimum effort. However, you are required to provide some settings during installation.
Using the form installer to set up your form
To make your setup as easy as possible, the form package comes with an installer. This is a form where you enter in the settings for your form. Here's an overview of the form installer.
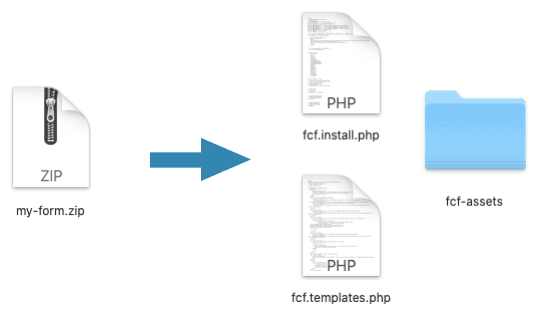
Unzip the download package
The first thing to do when you download your package is to unzip the files to a folder on your computer. Double clicking on the zip file will usually extract the files for you.
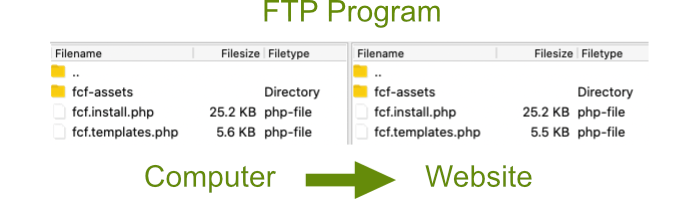
Upload files to your website
Connect to your website for file transfer (SFTP or Cpanel file upload for example), and upload ALL the files to the folder where you want your contact form to be installed. You must upload all files including the folder "fcf-assets" and all the files unside this folder.
Important: The installer will generate your form with the a name like 900101.form.htm.
Check file and folder permissions
In most cases the file and folder permissions will be correct and you do not need to change anything.
Check that the files have 0644 (read and write for the owner, read for other users).
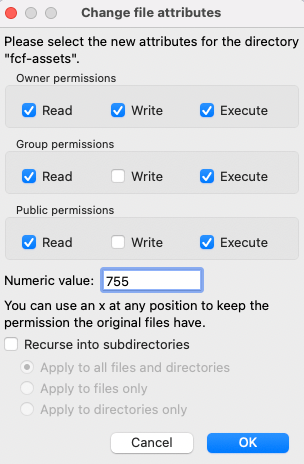
Check that the folders fcf-assets, fcf-assets/js, fcf-assets/email-templates have 0755 (read, write and execute for the owner, read and execute for other users).
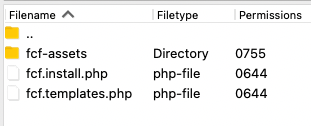
If you're using an FTP/SFTP client like FileZilla, you can check and set the permissions by right-clicking on the folder and selecting permissions.
You can also check and change folder permissions if you're using File Manager for cPanel by clicking on the folder then selecting the "permissions" option.
if you're using an interactive shell to send commands to your Web Server then you can change the folder permissions by running the following command:
chmod 755 fcf-assets
chmod 755 fcf-assets/js
chmod 755 fcf-assets/email-templates
Browse to the installer
In your browser, go to your website as you normally would. If you uploaded your files to the root of your website, then go to website.com/fcf.install.php. Or if you uploaded your files to a folder (for example "folder"), then go to website.com/folder/fcf.install.php

Enter your License Key

Enter your License Key which you can find in your purchase email, or the members page.
Select your forms language

Pick the langauage for your form. This will set the HTML language and define the language to use for form validation messages.
Languages available include: Dutch, English, French, German, Greek, Italian, Portuguese, Russian, Spanish, and Turkish. More language are on the way and you can easiliy add your own.
Email message details
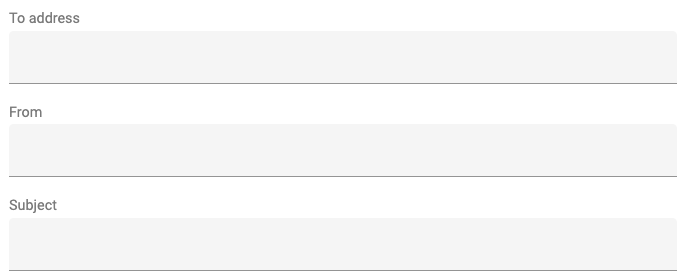
The first field "To address" is the email address where your form submissions will be sent to.
The second field "From" is the email address used to send the email from. It's highly recommended that you use an email address used by your hosting account, otherwise emails may be rejected.
The third field "Subject" is the email subject line used for the email.
There is more advanced settings you can use, more details available in the Configuration section later on.
Redirect after form submission Optional
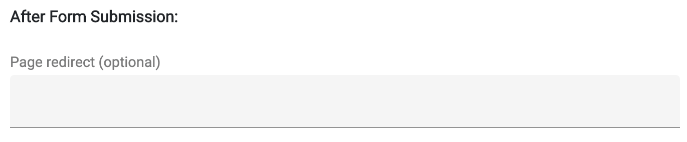
By default the form will show a thank you messsage (configured in the form creator).
To have the form redirect to a new page instead, add the URL in this field. The URL must be relative to the form.
Do you want to send an Auto-Response email to your visitor? Optional
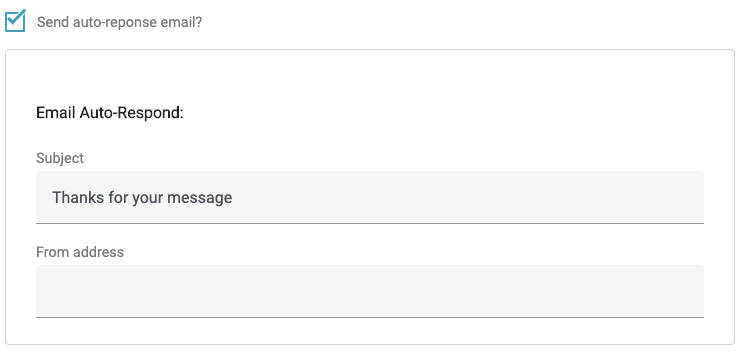
This is entirely optional, if you want to configure this, first tick the checkbox before completing the fields shown.
The first field "Subject" is the email subject line used for the auto-respond email to your visitor.
The second field "From" is the email address used to send the email from. It's highly recommended that you use an email address used by your hosting account, otherwise emails may be rejected.
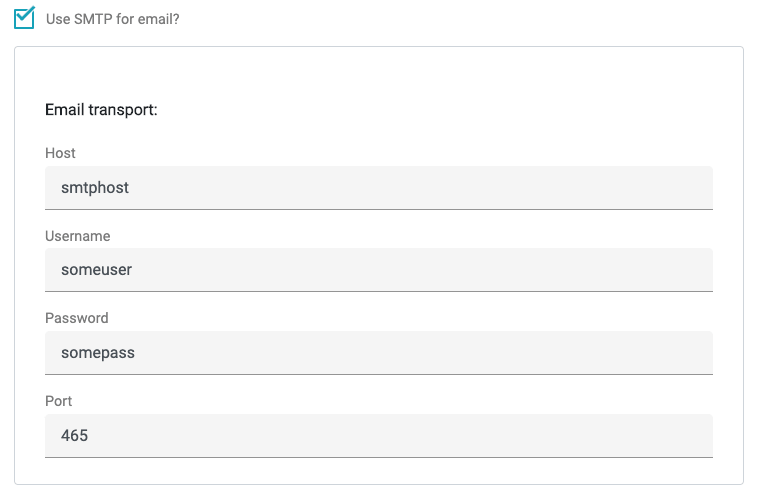
Use SMTP to send emails Optional
If you want to send your emails using SMTP, tick this box and complete the fields with your own SMTP values.
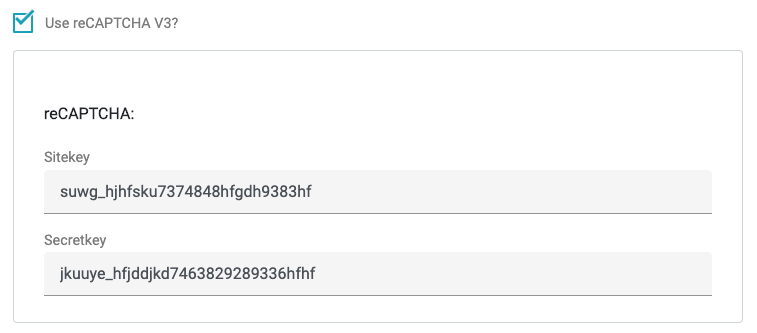
Protect your form with reCAPTCHA Optional
If you intend on using reCAPTCHA to protect your form from unwanted spambots and suspicious traffic, tick this box and enter your site key and secret key.
Find out how to set-up a Google reCAPTCHA account
Complete the installation
The final stage is to click on the "Install Form" button. This will generate all the required code and configuration for your form. Once complete, you should see the following message.
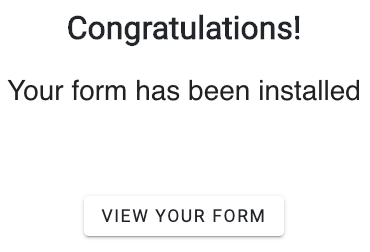
Your form is now ready to use!
Please now test your form to make sure it's been configured correctly and is sending emails. If you experience any problems, please double check all your settings. If you continue to have issues, take a look at the form troubleshooting page for help.
You can now add additional page contents around the form, or take the form HTML code and add it to your existing contact page.
Adding the form to your website
At this point, your form should be installed (see above). To add the form to an existing webpage, simply copy the HTML code from your new form page (for example: 900101.form.htm) and paste it to your page.
To keep things nice and tidy, you should exclude the following code:
At the very top - remove
<!DOCTYPE html>
<html lang="en">
<head>
<meta charset="utf-8">
<meta name="viewport" content="width=device-width, initial-scale=1, shrink-to-fit=no">
Keep the Style Sheets links (for example: <link href="fcf-assets/css/fcf.default.css" rel="stylesheet">).
Also remove.
<title>your title</title>
</head>

<body>
At the very bottom - remove
</body>
</html>
You can also move the JS and CSS code references to where you're other JS and CSS code references are. It's often best-practice to put the CSS references at the top of your page and the JS at the end.
The rest of this page contains more advanced information which you don't usually need to know.
Getting to know the files

Here's a quick list of some of the important files which make up the form package.
Usually, you only need to consider the configuration file. However, if you want more power, gaining a basic understanding of some of the other files will come in useful.
- 900101.form.htm - This is the form which appears on your website. The number on the filename will be unique. You can rename it if you want.
- fcf-assets/900101.config.php - Configuration file
- fcf-assets/css/fcf.default.css - Default styles sheet.
- fcf-assets/css/fcf.materialize.css - Alternative (material design) styles sheet
- fcf-assets/js/900101.form.js - Form validation (client-side).
- fcf-assets/email-templates/900101.email-in.htm - Email templates (4 files in total)
The forms HTML file
900101.form.htmYour form name will have a unique number before ".form.htm". The form code is made up of the four main sections:
- Reference to the style sheet
- The form
- The thank you message (hidden before the form is submitted)
- References to the JavaScript files
    <!-- 1: REFERENCE TO STYLE SHEET -->
    <link href="fcf-assets/css/fcf.default.css" rel="stylesheet">
    <link href="fcf-assets/css/900101.default-custom.css" rel="stylesheet">
    ...
    <!-- 2: THE FORM -->
    <div id="fcf-form">
    ...
    <!-- 3: THANK YOU MESSAGE -->
    <div id="fcf-thank-you">
    ...
    <!-- 4: REFERENCES TO JAVASCRIPT FILES -->
    <script src="fcf-assets/js/fcf.just-validate.js"></script>
    <script src="fcf-assets/js/900101.form.js"></script>
Top Tip!
You may be interested in changing the message which is shown to your visitor after they submit the contact form.
This is the default code (your message may be different):
    <div id="fcf-thank-you">
    <!-- Thank you message goes below -->
    <h3 class="fcf-h3">Thank you for getting in touch</h3>
    <p>We appreciate you contacting us. We will get back in touch with you soon.</p>
    <!-- Thank you message goes above -->
    </div>
Or you can have the form redirect to another page (see quick install steps above).
Spam Prevention with reCAPTCHA
If you're using reCAPTCHA V3, then there are two additional parts you should be aware of.
- Sitekey inside a hidden form field
- Sitekey in a JavaScript reference
    <!-- NEAR THE TOP OF THE FORM CODE -->
    <input type="hidden" id="recaptcha-sitekey" value="[SITEKEY]">
    ...
    <!-- AT THE BOTTOM, AT THE JAVASCRIPT FILE REFERENCES -->
    <script src="https://www.google.com/recaptcha/api.js?render=[SITEKEY]" async defer></script>
You should make sure that you put your sitekey value in the [SITEKEY] parts.
Find out how to get your Google reCAPTCHA Keys.
The forms configuration file
fcf-assets/900101.config.phpAs you can see from the file extension, this is a PHP file and is used by your Server when processing the form submissions.
The file is split into the following sections:
- License key
- Form field validation
- Thank you page
- Email templates - incoming
- Email templates - auto-response
- Email message
- Email transport
- reCAPTCHA V3
Let's go through each part.
Configuration - License Key
    // ***********
    // LICENSE KEY
    // ***********
    define('KEY', 'YOUR-KEY-HERE');
This one is nice and simple. Just replace the YOUR-KEY-HERE part with your license key.
Configuration - Form Field Validation
// *********************
// FORM FIELD VALIDATION
// *********************
$rules = array(
  "Name" => array(
    "required" => true,
    "label" => "Your name",
    "maxLength" => 100
  ),
  "Email" => array(
    "required" => true,
    "label" => "Your email address",
    "maxLength" => 100,
    "email" => true
  ),
  "Phone" => array(
    "required" => false,
    "label" => "Your phone number",
    "maxLength" => 30
  ),
  "Message" => array(
    "required" => true,
    "label" => "Your message",
    "maxLength" => 3000
  )
);
The purpose of the form field validation section is to set which fields on the form should be validated. This is pre-set, so you probably don't need to change.
The form validation is already carried out in the browser prior to this, however this is only a back-up in case your visitor has a browser issue that prevents the validation from functioning client-side.
Configuration - Thank you page
// ******************
// THANK YOU PAGE
// ******************
define('THANK_YOU_PAGE','thankyou.htm');
This is optional, the default behaviour of the form is to show a message on the same page as the form.
By adding a page here (thankyou.htm in the example above), you will enable this feature.
Setting this empty, for example: define('THANK_YOU_PAGE',''); will keep the default behaviour.
Configuration - Email Templates Incoming
    // **************************
    // EMAIL TEMPLATES - INCOMING
    // **************************
    define('EMAIL_TEMPLATE_IN_HTML', '900101.email-in.htm');
    define('EMAIL_TEMPLATE_IN_TEXT', '900101.email-in.txt');
Email Templates Incoming is referencing template files that are used to create the email sent to you after someone uses your form. You do not need to change anything directly here, however, if you want to change the format of your email, then take a look at the template .htm and .txt files.
Emails are sent as multipart HTML with a Text alternative. So, if you can't receive HTML emails for whatever reason, then the text version will be shown.
Because we're looking at the configuration file, We'll not explain how the email template works here. You can find out more about that later.
Configuration - Email Templates Auto-Response
    // *******************************
    // EMAIL TEMPLATES - AUTO-RESPONSE
    // *******************************
    define('EMAIL_TEMPLATE_OUT_HTML', '900101.email-out.htm');
    define('EMAIL_TEMPLATE_OUT_TEXT', '900101.email-out.txt');

    define('SEND_AUTO_RESPONSE', 'YES'); // YES OR NO
    define('EMAIL_OUT_SUBJECT', 'Thanks for your message');
    define('EMAIL_OUT_TO', 'FIELD:Email');
    define('EMAIL_OUT_TO_NAME', 'FIELD:Name');
    define('EMAIL_OUT_FROM', '');
    define('EMAIL_OUT_FROM_NAME', '');
If you would like to send an email to your visitor after they send a message through your form, then look at this section.
The first two lines reference where the HTML and Text email templates are located.
SEND_AUTO_RESPONSE - setting the value to YES will send the auto-response, NO will not.
EMAIL_OUT_TO - The default value for this is 'FIELD:Email', this means the email will be sent to the email address which was entered into the "Email" field in the form.
EMAIL_OUT_TO_NAME - The value for this is 'FIELD:Name', this means the email will be marked with the name which was entered into the "Name" field in the form.
The last two fields are very important (if you want to use an auto-response email feature), you MUST complete these two fields. The first with the email address which the auto-response email will be sent from, the next is the name related to it.
Examples of the last to fields:
define('EMAIL_OUT_FROM', '[email protected]');
define('EMAIL_OUT_FROM_NAME', 'Example Inc.');
Configuration - Email Message
    // *************
    // EMAIL MESSAGE
    // *************
    define('EMAIL_TO', '');
    define('EMAIL_TO_NAME', '');

    define('EMAIL_TO_CC', '');
    define('EMAIL_TO_CC_NAME', '');

    define('EMAIL_TO_BCC', '');
    define('EMAIL_TO_BCC_NAME', '');

    define('EMAIL_FROM', '');
    define('EMAIL_FROM_NAME', '');

    define('EMAIL_REPLY_TO', 'FIELD:Email');
    define('EMAIL_REPLY_TO_NAME', 'FIELD:Name');

    define('EMAIL_SUBJECT_BEFORE', 'Contact Form:');
    define('EMAIL_SUBJECT', 'FIELD:Subject');
    define('EMAIL_SUBJECT_AFTER', '');
Here's a grid with details of each field:
| Setting | Description |
|---|---|
| EMAIL_TO Required |
Email address where the form will be sent to. |
| EMAIL_TO_NAME Optional |
Name part of the email. |
| EMAIL_TO_CC Optional |
Email CC address where the form will be sent to. |
| EMAIL_TO_NAME_CC Optional |
Name CC part of the email. |
| EMAIL_TO_BCC Optional |
Email BCC address where the form will be sent to. |
| EMAIL_TO_NAME_BCC Optional |
Name BCC part of the email. |
| EMAIL_FROM Required |
Email address where the form will be sent from. You can use "FIELD:Email" if you want the email address to be the one entered into the forms Email field. Some hosting providers or SMTP providers need to have a known email address in here, if that's the case, then you may need to put your own email address in here. It's ok for this to be your own email, as the EMAIL_REPLY_TO option below can also be used. |
| EMAIL_FROM_NAME Optional |
Name part of the email. You can use "FIELD:Name" if you want the name to be the one entered into the forms Name field. |
| EMAIL_REPLY_TO Optional |
Email address where the form will be sent if you reply to the message. You can use "FIELD:Email" if you want the email address to be the one entered into the forms Email field. |
| EMAIL_REPLY_TO_NAME Optional |
Name part of the email. |
| EMAIL_SUBJECT_BEFORE Optional |
If you make use of the next setting using a "FIELD:Subject" option, then this value is prepended to the subject line. |
| EMAIL_SUBJECT Optional |
If you want the subject to be a value from your form, for example if you have a "Subject" drop-down field, then you can use "FIELD:Subject". Or you can just enter a subject line. For example, "Contact form message" |
| EMAIL_SUBJECT_AFTER Optional |
If you make use of the above setting using a "FIELD:Subject" option, then this can be appended to the subject line. |
Configuration - Email Transport
    // ***************
    // EMAIL TRANSPORT
    // ***************
    define('USE_SMTP', 'YES'); // YES or NO
    define('SMTP_HOST', '');
    define('SMTP_USER', '');
    define('SMTP_PASS', '');
    define('SMTP_AUTH', 'YES');
    define('SMTP_SECURE', 'STARTTLS'); // STARTTLS, SMTPS (port 465) or empty
    define('SMTP_PORT', '587');
    define('SMTP_DEBUG', 'NO'); // YES or NO
Here are more details on these settings:
The first setting USE_SMTP can accept two values, either YES or NO. If you set it to YES, then you must provide values for the rest of the settings in this section.
If you're using SMTP, then you will need to supply the HOST, USER, and PASS values.
SMTP_AUTH should usually be set to YES. But if your SMTP server has authentication switched-off, then change this to NO.
The next two settings, SMTP_SECURE and SMTP_PORT usually work together. The most common settings are:
STARTTLS with port 587, or SMTPS with port 465.
Sometimes you may need to try different combinations to find the correct values for your environment.
If you're having issues getting your form to send emails, then set SMTP_DEBUG value to YES. This will provide a whole bunch of information that can help identify the issue. The most common issue is with the user, pass, and port number having the wrong values.
Configuration - reCAPTCHA
    // ************
    // reCAPTCHA V3
    // ************
    define('RECAPTCHA_SITEKEY', '');
    define('RECAPTCHA_SECRETKEY', '');
    define('RECAPTCHA_SCORE', '0.5');
    define('RECAPTCHA_ACCEPT_LOW_SCORE', 'YES'); // YES or NO
If you would like to make use of Google's reCAPTCHA human verification system to stop unwanted automated spam, then complete this section.
Obtain your "site key" and "secret key" values from reCAPTCHA. Read our guide on how to get your Google reCAPTCHA Keys.
The RECAPTCHA_SCORE is a score which the service provides on how likely the form visitor is to be a bot. The score can be anything from 0 to 1. The current minimum accepted value is 0.5 if you want you can change this.
If you want to allow all messages through regardless of the score, then set RECAPTCHA_ACCEPT_LOW_SCORE value to YES. Otherwise set it to NO will silently discard any form submissions below the score limit.
The forms CSS file
fcf-assets/css/fcf.default.css
fcf-assets/css/900101.default-custom.css
Or
fcf-assets/css/fcf.materialize.css
The required styles for the form are included in this file. If you want to change anything to do with the colours or layout, this is the place to do it.
Depending on the form version you have, there may other alternative styles available which changes the form look. If you want to switch styles, change the CSS reference in your forms HTML file.
If you're using the default style, then you can change your forms core color settings in the theme file below:
fcf-assets/css/900101.default-custom.cssThe contact forms JavaScript file
fcf-assets/js/900101.form.jsThis file has a number of responsibilities, but the main one you may be interested in is the form field validation.
As mentioned above in the configuration section, the form validation is first done in the browser before the form is submitted.
This is the part in the JS file which sets the required validation settings you want.
rules: {
    Name: {
        required: true,
        minLength: 2,
        maxLength: 60
    },
    Email: {
        required: true,
        email: true
    },
    Subject: {
        required: true,
        minLength: 2,
        maxLength: 100
    },
    Message: {
        required: true,
        minLength: 15,
        maxLength: 3000
    }
}
In the above example, four fields have been included. Name, Email, Subject, and Message all specify that the fields are required and set the minimum and maximum acceptable value lengths. The email field is a required field, and it also states the validation type is 'email'. This will be pre-set for you, so you shouldn't need to change.
The forms Email templates
fcf-assets/email-templates/900101.email-in.htmThis file (along with the .txt version) is used to generate the email which is sent to you after each form submission.
Element like this one: {Name} will be replaced with the form field submitted value.
fcf-assets/email-templates/900101.email-out.htmThis file (along with the .txt version) is used to generate the email which is sent to your visitor (if you have enabled auto-respond option) after each form submission.
The forms language files
fcf-assets/js/lang/fcf.en.jsThis folder holds the list of language files that contain the messages shown on the form.
Creating your own language file
If you're language is not yet available, you can add one by taking a copy of fcf.en.js and naming it to your language, for example fcf.AA.js (where AA is the two letter international language code). Once you have your new file, update the messages on the right side of the name value pairs. Be careful not to break the file formatting.
var lang = {
    "info": {
        "languageNative": "English",
        "languageEnglish": "English"
    },
    "client": {
        "required": "This field is required",
        "email": "Please type a valid email"
        // ... etc
    },
    "server": {
        "pleaseWait": "Please wait..",
        "errorMessage": "Error message"
        // ... etc
    }
};
To allow your form to use your new language file, look for the following line of code (near the end of the HTML) and rename fcf.en.js to match your language file name.
Before:
<script src="fcf-assets/js/lang/fcf.en.js"></script>
After:
<script src="fcf-assets/js/lang/fcf.AA.js"></script>
It's also good practice to declare your HTML document language as follows (replace "en" with your language).
<html lang="en">